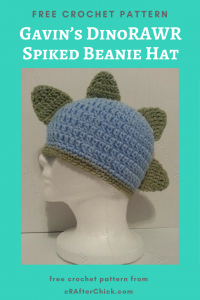
Gavin’s DinoRAWR Spiked Beanie Hat Crochet Pattern
free crochet pattern from cRAfterChick.com

This crochet pattern was designed in honor of and for a little Juvenile Arthritis hero of mine, Gavin. He is a big dinosaur fan so I figured I would make something special for him. It turned out to be a pretty easy and quick way to customize a hat for the dinosaur fan in your life. Give is a try. Happy crafting!
Gavin’s DinoRAWR Spiked Beanie Hat Crochet Pattern Notes
Project requires:
Main Colored Yarn for Beanie Hat
(I use a lot of Red Heart Saver yarn but any medium to normal weight yarn will be fine)
Contrast yarn for bottom contrast trim and dinosaur spikes
“J” hook (6.0 mm)
Scissors or Yarn Cutter
Blunt large eye yarn / tapestry needle to weave in ends
Abbreviations used in this pattern:
ch – chain
st – stitch
sl st – slip stitch
sc – single crochet (US)
dc – double crochet (US)
Pattern Instructions:
*Note: This project is worked in the round on the base of a magic ring. If you do not know how to do this, please see tutorial here from: yarntomato on CrochetMe
The hat in this picture is made with my Easy Peasy Pre-Teen / Teen / Women Double Crochet Beanie Pattern which you can find here as a foundation for the project. Want it in another size? No worries. Head over to Easy Peasy All Family Sizes Free Double Crochet Beanie Patterns to select the size you want for your project.
Hat Base:
Use Easy Peasy Crochet Beanie Size of your choice
Once you have completed your beanie for the base you are ready to get started on making this a dinoRAWR spiked hat. 🙂
Hat Contrast Band: using contrast color yarn of your choice
Taking contrast color yarn, attach to bottom of last round of beanie with a sl st. Ch 1 and work 1 sc in to each st around. Sl st to top of first st in round.
Cut yarn and fasten off.
If you like a wider contrast band or want to make the color contrast pop more, try adding an additional row of sc to the bottom. I sometimes do this when I feel a project needs it but it’s not necessary, just my personal preference. 🙂
Dinosaur Spikes (Make 4):
Round 1: In magic circle, ch 2 before making 8 dc into circle. Sl st to top of first st in round. (8 dc)
Round 2: Ch 2. Place 3 dc in first st, 1 dc in each of the next 3 st, 3 dc in next st and 1 dc in last st. Sl st to top of first st in round. (12 dc)
Round 3: Ch 2. 1 dc in 1st, 3 dc in following st, 1 dc in each of the next 5 st, 3 dc in next st, 1 dc in each of last 4 st. Sl st to top of first st in round. (16 dc)
Round 4: Ch 3. 1 dc in first 2 st, 1 dc in each of the following 7 st, 3 dc in next st, 1 dc in each of last 5 st. Sl st to top of first st in round. (20 dc)
Round 5: Sl st in first two st. Fold your spike in half so that you are now working in a corner. Ch 1 before placing 1 sc through both st lined up in fold and in each to the end. (10 sc)
Make sure you leave a long enough tail to secure your spike to the crocheted hat when finished!
Cut yarn and pull through. Put to side until finished with all 4 spikes (or desired amount if you want more or less)
Finishing off:
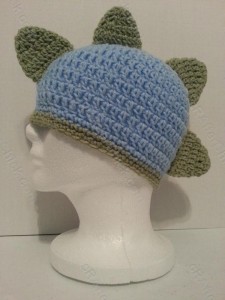
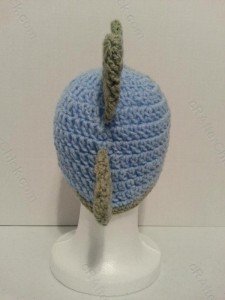
At this point you should have your finished crocheted beanie hat base and your finished dinosaur spikes. For this hat I arranged them evenly from front forehead to back of head by pinning mine in place first with straight pins to make sure placement was okay. Yes I have a little bit of OCD with my crocheting. This is not necessary but it’s a good idea to mark your starting or ending points with pins, stitch markers or even a few short scraps of yarn.
Taking your yarn needle, use tails on spikes to sew them directly on to the beanie hat. I just did a basic in and out stitch to weave it in securely. Pull yarn through to inside of hat after spike is attached, perform a double knot (where you pass the yarn through the loop twice before pulling tightly to close). You can do one or two additional knots if you prefer, I often do but it’s because I’m always paranoid of unraveling. I haven’t had that happen since using the double knots though so it will do the job well. 🙂
One you have all the spikes attached where you want them, fasten off any loose ends, cut additional yarn, weave in and you are all done.
All done. One super special DinoRAWR crocheted hat. This pattern is dedicated to my little Juvenile Arthritis hero Gavin.
Here are some pictures to show how this hat looks worn and from different angles:
Want more free patterns? Follow cRAfterChick on Facebook or Pinterest to get updates on patterns as they are added.
Note: All the cRAfterChick patterns shared on this site are free of charge. Please feel free to use them to make your own items. If you use it to make items to sell please credit cRAfterChick for the pattern and provide link to our site. Please do not copy and paste my pattern or try to use my images as your own. You can link to any of my patterns. Happy crafting!


