

Adventure Time’s Finn Character Hat Crochet Pattern
free crochet pattern from cRAfterChick.com
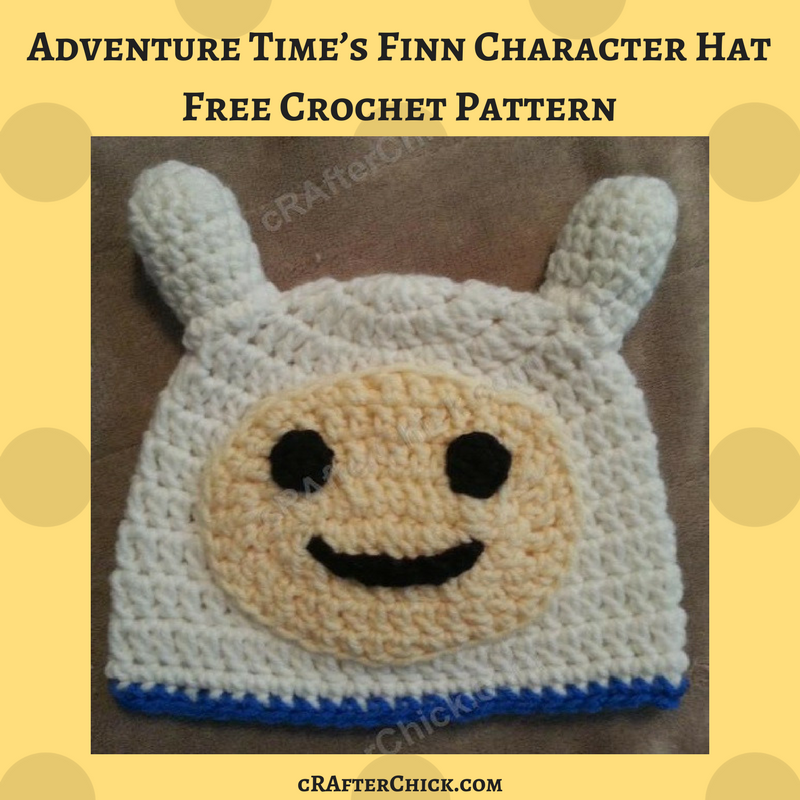
This character hat is my crochet interpretation of the character Finn from the popular cartoon series Adventure Time. I see him everywhere I turn and since my nephew is a giant fan as well as myself, I decided to make Finn plus a Jake hat for him to wear. I posted it on my personal Facebook account when I finished it a few days ago and you would be surprised by how many adults said they wanted one. See? Cartoons are not just for kids. Even big kids like myself can enjoy them. 😀
This is actually a lot easier than it may look. If you can work in the round and are an experienced beginner or up, give Finn a try. It makes a great and fast hat project to gift for a fan or pop on yourself for some fun. I love wearing my silly hats out in public. If you have any questions, please let me know.
Have you not heard of Finn or Adventure Time yet? I guess that’s possible. 😉 If you haven’t and want to learn more, please check out information here.

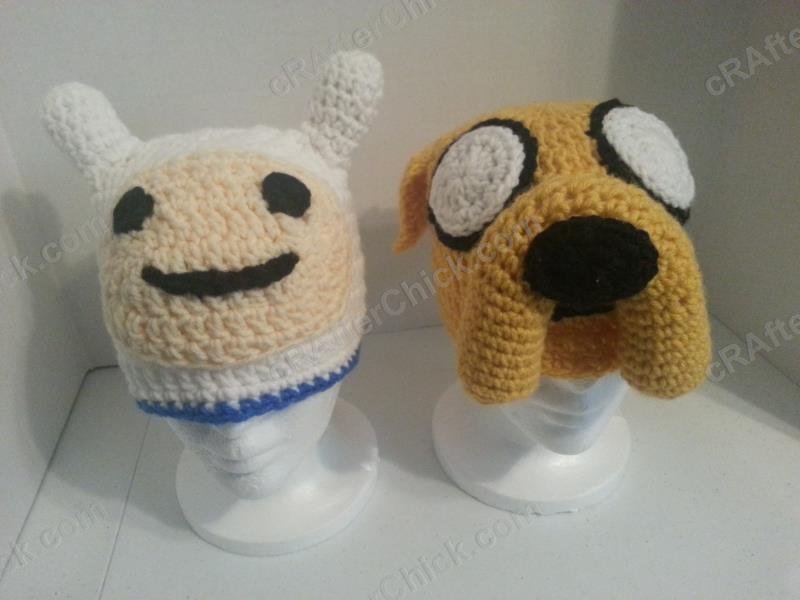
Oh and you didn’t think I just made Finn and not Jake right? Here is the set together. 🙂 You can find the Adventure Time’s Jake the Dog Character Hat Crochet Pattern here.
Adventure Time’s Finn Character Hat Crochet Pattern Notes

Project requires:
White yarn for beanie main color and hat ears
Black yarn for face features
Tan, dark cream or light peach colored yarn for face area
Bright blue yarn for contrast trim band on beanie
“J” hook (6.0 mm)
Scissors or Yarn Cutter
Blunt large eye yarn / tapestry needle to weave in ends and sew pieces together
Small amount of fiberfill stuffing for ears on top of hat
Abbreviations used in this pattern (US crochet stitches):
ch – chain
st – stitch
sl st – slip stitch
sc – single crochet (US)
dc – double crochet (US)
hdc – half double crochet (for smaller sizes only) (US)
Pattern Instructions:
*Note: This project is worked in the round on the base of a magic ring. If you do not know how to do this, please see tutorial here from: yarntomato on CrochetMe
The hat in this picture is made with my free Easy Peasy Youth Sized (Age 3-10 years old) Double Crochet Beanie Hat Pattern which you can find here as a foundation for the project. Want it in another size? No worries. Head over to Easy Peasy All Family Sizes Free Double Crochet Beanie Patterns to select the size of the free pattern you want for your project.
Hat Base: in main color white yarn Use Easy Peasy Crochet Beanie Size of your choice
Once you have completed your beanie for the base you are ready to start building your Adventure Time Finn character hat. Starting off we are going to add a contrast trim to the bottom of the beanie. This is done in a bright blue to mimic the colors in Finn’s outfit. No matter what size easy peasy beanie you choose, the instructions are the same.
Taking your bright blue yarn, sl st to attach yarn to last st worked on beanie hat. Ch 1 before placing 1 sc in 1st st and 1 sc in each st around until you have reached back to beginning of round. Sl st in to the top of the 1st st in round. Fasten off.
Hat ears (Make 2): using white yarn
Note: I tend to make my st tight when working pieces that will be stuffed so if you tend to make looser sts with wider gaps, try switching your hook out for a size or two smaller to help keep the st gaps smaller.
Round 1: In a magic circle, ch 2 before placing 6 hdc in circle. Pull circle closed and sl st in the top of the 1st st in round. (6 hdc)
Round 2: Ch 2 before placing 2 hdc in 1st st and each of the following 5 st around. Sl st in the top of the 1st st in round. (12 hdc)
Round 3-5: Ch 2 before placing 1 hdc in 1st st and each of the following 11 st around. Sl st in the top of the 1st st in round. (12 hdc)
Round 6: Ch 1 , make 1 hdc in 1st 6 st, 1 sc in next 2 st, sl st in last 4 st. Sl st in to the top of the 1st st in round. (6 hdc, 2 sc) This will give you the slanted edge to attach to your rounded beanie so they are pointing up and more upright 🙂
Leave an extra long tail to attach to hat, cut yarn, pull through yarn and put to side until needed in assembly. If you choose the next optional step for bottoms for this piece, make sure you leave an extra little bit of length to secure it in place during assembly.
This feature will work on toddler, youth, pre-teen, teen, womens and men sized hats very well. For smaller sizes do all st in sc instead of hdc and skip round 4.
Bottom to hat ear piece (Make 2) *optional*: using white yarn
Round 1: In a magic circle, ch 2 before placing 12 hdc in circle. Pull circle closed and sl st in the top of the 1st st in round. (12 hdc) Fasten off and repeat for second piece.
This feature will work on toddler, youth, pre-teen, teen, womens and men sized hats very well. For smaller sizes do all st in sc instead of hdc as step above calls for.
Colored face area: using tan, dark cream or light peach yarn
Round 1: Ch 12. Place 1 dc in to the 3rd ch from the hook, make 1 dc in next 8 ch and 2 dc in last ch. Rotate your piece so you are now working back of foundation chain. Place 1 dc in 1st ch on this side (same as last used in previous side), 1 dc in next 8 ch and 2 dc in last st (same as 1st worked in round). Sl st in to the top of the 1st st in round. You will now have your foundation round for your oval worked in the round. (22 dc)
Round 2: Ch 2 before placing 1 dc in 1st st, 1 dc in each of the following 8 st, 2 dc in following 3 st, 1 dc in next 8 st, 2 dc in next 2 st, 1 dc in same st as 1st dc in round worked. Sl st in top of the 1st st in round. (28 dc)
Round 3: Ch 2 before placing 1 dc in 1st, 1 dc in each of the following 8 st, 2 dc in next st, 1 dc in next st, 2 dc in next st, 1 dc in next st, 2 dc in next st, 1 dc in following 9 st, 2 dc in next st, 1 dc in next st, 2 dc in next st, 1 dc in next st , 2 dc in next st and sl st in the top of the 1st st in round. (34 dc)
Round 4: Ch 1 before placing 1 sc in 1st st, 1 sc in each of the following 8 st, 2 sc in next st, 1 sc in next 2 st, 2 sc in next st, 1 sc in next 2 st, 2 sc in next st, 1 sc in following 10 st, 2 sc in next st, 1 sc in next 2 st, 2 sc in next st, 1 sc in next 2 st, 2 sc in following st and 1 sc in remaining st. Sl st in top of the 1st st in round. (40 sc)
Leave an extra long yarn tail that is long enough to secure the face area directly on to the beanie hat once assembled during finishing off steps, cut yarn and pull through. Place to side until needed in finishing off stage.
This feature will work on toddler, youth, pre-teen, teen, womens and men sized hats very well. For smaller sizes:
For toddlers you may want to switch to hdc instead of dc throughout this feature if you want to scale it down some.
For 6 months to 12 months sized hats, switch to hdc instead of dc for rounds 1 and 2. For round 3, make it in sc instead of dc pattern calls for and leave off round 4.
For newborn to 6 months sized hats, make round 1 in hdc, round 2 and 3 in sc. Leave off round 4.
Eyes (Make 2): using black yarn
Round 1: In a magic circle, ch 2 before placing 6 sc in circle. Pull circle closed. Sl st in to the top of the 1st st in the round. (6 sc)
Leave tail long enough to secure on to the face area during assembly, cut yarn and pull through. Place to side until needed in finishing off stage. Repeat for second eye.
This feature will work on toddler, youth, pre-teen, teen, womens and men sized hats very well. For smaller sizes that toddler, newborn to 12 months, make 3 sc in circle instead.
Smile: using black yarn
Make a chain of 8. Leave tail long enough to secure on to the face area during assembly, cut yarn and pull through. Place to side until needed in finishing off stage.
This feature will work on toddler, youth, pre-teen, teen, womens and men sized hats very well. For smaller sizes, newborn to 12 month sizes, make a ch of 5 instead of ch of 8 as step above calls for.
Finishing off:
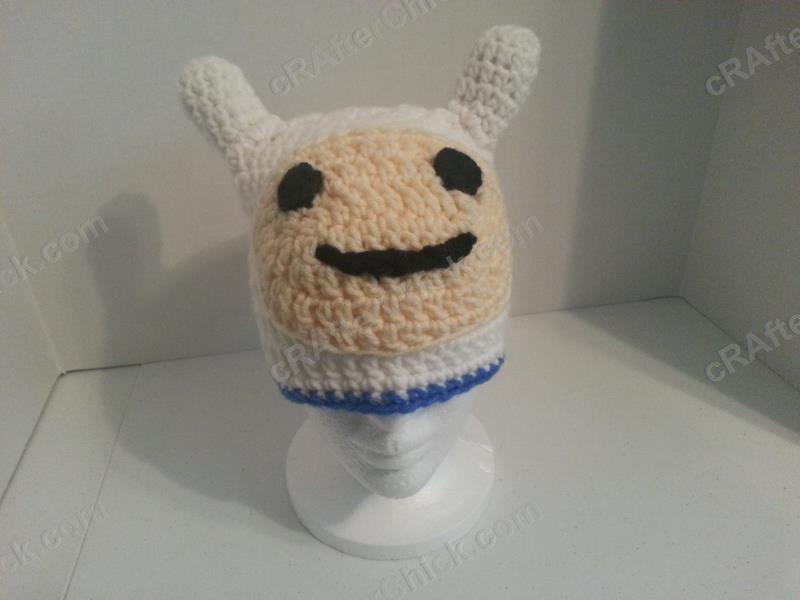
Starting with your colored face area assembly, use the tail left on your smile ch and your yarn needle to sew your smile in desired location on the face area. You can reference the clipart for Finn above or my pictures to see how I placed my own for this feature. Once securely in place, pull yarn to back side of face area and fasten off.
Next take the yarn tail left on one of your crocheted eyes using your yarn needle to sew it in place. Once done, pull yarn to back side of face area before fastening off. Repeat this process for the second eye.
You now should have one colored face area completely assembled with one extra long yarn tail for attaching this to the front of your beanie. If you see any others on the face area you may have missed during assembly, fasten them off now. Taking the yarn tail left on your face area, use your yarn needle to securely fasten it in desired location on front of your beanie hat. I placed my own just above the last round of dc worked in my own beanie hat but feel free to play around with the placement before attaching your own. Once you have is secured, pull yarn to inside of beanie hat and fasten off.
Next up is our hat ear assembly. If you chose to skip the optional step of hat ear base, skip to next paragraph instead. Taking the white yarn tail left on one hat ear sew around the opening and through lined up ear hat base so that it will cover up your opening with the yarn needle you are using. Make sure you stop between 2/3 to 3/4 of the way around to stuff small amount of fiberfill stuffing in to the hat ear piece before closing up all the way. Once closed up, use the remaining yarn tail with your yarn needle to attach the assembled hat ear on top of your beanie hat on one top side. Once securely in place, pull yarn to inside of hat and fasten off. I like to reinforce large features with a few extra stitches or knots on the inside before fastening off but this isn’t necessary. Now repeat the process above for the second hat ear.
If you chose to skip the hat ear base, these are your instructions for ear assembly. Take the white yarn tail left on one hat ear and use your yarn needle to sew it securely in desired location on your beanie hat. You want to make sure that you stop between 2/3 to 3/4 of the way around to stuff small amount of fiberfill stuffing in to the hat ear piece before sewing it completely closed flush on the hat. Once closed up, use the remaining yarn tail with your yarn needle to attach the assembled hat ear on top of your beanie hat on one top side. Once securely in place, pull yarn to inside of hat and fasten off. I like to reinforce large features with a few extra stitches or knots on the inside before fastening off but this isn’t necessary. Now repeat the process above for the second hat ear.
Tip: When stuffing the hat ear pieces, just stuff enough to maintain the desired shape of your hat ears so they will stay upright. If you over stuff them it will bubble the bottom and scrunch up surrounding area while wearing it. It can also cause drooping due to weight.
Now take a few moments to double check over your work for any loose ends or tails you may not of fastened off during assembly of your Finn hat. If you find any, go ahead and fasten off. All done! One super duper cool Adventure Time Finn character hat. 🙂
I just know my nephew is going to go crazy over his when I give it to him. I sent a picture to my brother and he said he might steal it to “rock it”. hehe
Here are some of the additional pictures taken to show how the completed Finn hat looks when worn:


Want more free patterns? Follow cRAfterChick on Facebook or Pinterest to get updates on patterns as they are added.
Note: All the cRAfterChick patterns shared on this site are free of charge. Please feel free to use them to make your own items. If you use it to make items to sell please credit cRAfterChick for the pattern and provide link to our site. Please do not copy and paste my pattern or try to use my images as your own. You can link to any of my patterns. Happy crafting!
Those are sooo cute,Thank You for sharing! My youngest likes this show
Thank you 🙂 I’m working on face appliques for the characters as well currently.