

Yoshi Character Beanie Hat Crochet Pattern
free crochet pattern from cRAfterChick.com

How could I not love Yoshi from Super Mario Brothers? I think he is adorable so I thought I would try to make him into a crochet hat for my nephews to go with the Mario and Luigi beanie hats I made them previously. You can see them here.
This was a fun project to make for them and I fell in love with the hat by the time it was finished. I have a feeling I will have to make more or the three of them will fight over who can wear Yoshi. 🙂

Yoshi Character Beanie Hat Crochet Pattern Notes

Project requires:
Light Bright Green Yarn for Beanie Hat main color and nose/snout- (I use a lot of Red Heart Saver yarn but any medium to normal weight yarn will do)
Black Yarn for eye pupils
White yarn for eye whites and cheek areas
Red Yarn for spikes
“J” hook (6.0 mm)
Scissors or Yarn Cutter
Blunt large eye yarn / tapestry needle to weave in ends
Small amount of fiberfill stuffing for nose/snout
Abbreviations used in this pattern (US crochet stitches):
ch – chain
st – stitch
sl st – slip stitch
sc – single crochet (US)
dc – double crochet (US)
hdc – half double crochet (US)

Pattern Instructions:
*Note: This project is worked in the round on the base of a magic ring. If you do not know how to do this, please see tutorial here from: yarntomato on CrochetMe
The hat in this picture is made with my Easy Peasy Youth Sized (Age 3-10 years old) Double Crochet Beanie Hat Pattern which you can find here as a foundation for the project. Want it in another size? No worries. Head over to Easy Peasy All Family Sizes Free Double Crochet Beanie Patterns to select the size you want for your project.
Hat Base: using light bright green yarn
Use Easy Peasy Crochet Beanie Size of your choice
Once you have completed your beanie for the base you are ready to start making your Yoshi hat!
Smile: using black yarn
Chain 16 leave tail long enough to sew on smile to nose/ snout in assembly before cutting yarn and pulling through. Set to the side until needed in finishing steps.
Nostrils (Make 2): using black yarn
Row 1: Ch 4. Place 1 sc in 2nd ch from hook and following 2 st. Sl st back in to last ch worked. (3 sc)
Leave a short tail to sew nostril in place on nose/snout during assembly. Cut yarn and pull through before putting to side until needed.
Repeat process for second nostril.
Eye Pupils (Make 2): using black yarn
Round 1: In magic circle, ch 1 before placing the following st in this order in to circle: 2 sc, 1 hdc, 1 dc, 1 hdc, 3 sc, 1 hdc, 1 dc, 1 hdc, 1 sc. Sl st in to the top of 1st st in round. (12 st total)
Leave a long enough tail in order to sew on to the Eye whites area before cutting yarn. Pull yarn through and put to side until needed in finishing off steps.
Repeat for second eye pupil.
Eye Whites: using white yarn
Row 1: Ch 14, 1 dc in 3rd ch from hook and each of the following ch until end is reached. Ch 2 and turn. (12 dc)
Row 2: Place 2 dc in first st, 1 dc in next 10 st, and 2 dc in last st. Ch 2 and turn. (14 dc)
Row 3: Place 1 dc in 1st st and each of the st across. Ch 2 and turn. (14 dc)
Row 4: Sc in 2nd st skipping 1st st in row, *1 hdc in next st, 1 dc in following st, 1 hdc in next, 1 sc in next*, sl st in following 2 st, sc in next *repeat from * to * Sl st in to last st in row. Now continue working row of sl st, 1 in each st, around back to beginning st in round. Sl st in to the top of 1st st in round.
Remember to leave a yarn tail that will be long enough to securely sew your eyes in place on to your Yoshi hat before cutting yarn. Pull yarn through and put to side until needed for eye assembly.
White Cheek Areas (Make 2): using white yarn
Round 1: In magic circle, ch 2 before placing 10 dc in circle. Pull circle closed tightly before connecting with a sl st to the top of the 1st st in this round. (10 dc)
Round 2: Ch 2 before placing 2 dc in 1st st and in the following 6 st. Work 1 sl st in each of the following 3 st and sl st in to the top side of the 1st st in round. (14 dc)
Leave yarn tail long enough to sew cheek area in place on your beanie hat.
Repeat for second cheek area.
Nose / Snout Backing: using green yarn
Round 1: In magic circle, ch 2 before placing 12 dc in circle. Pull circle closed tightly before connecting with a sl st to the top of the 1st st in this round. (12 dc)
Round 2: Ch 2 before placing 2 dc in 1st st and in each of the following 11 st. Sl st to top of 1st st in round. (24 dc)
Round 3: Ch 2 before working *2 dc in 1st st and 1 dc in next st* repeat until end of round. Sl st to top of 1st st in round. (36 dc)
Make sure you leave a long enough of a yarn tail in order to sew nose back on to the snout/ nose and then sew the assembled snout/ nose on to your beanie hat during assembly. Put to the side until needed in finishing off stage.
Nose / Snout Front: using green yarn
Round 1: In magic circle, ch 2 before placing 12 dc in circle. Pull circle closed tightly before connecting with a sl st to the top of the 1st st in this round. (12 dc)
Round 2: Ch 2 before placing 2 dc in 1st st and in each of the following 11 st. Sl st to top of 1st st in round. (24 dc)
Round 3: Ch 2 before working *2 dc in 1st st and 1 dc in next st* repeat until end of round. Sl st to top of 1st st in round. (36 dc)
Round 4: Ch 2 before placing 1 dc in 1st st and in each of the following 35 st. Sl st to top of 1st st in round. (36 dc)
Round 5: Ch 1 before working 1 sc in 1st st and 1 sc in each of the following 35 st. Sl st to the top of 1st st in round. (36 sc)
Fasten off
Yoshi Spikes (Make 2): using red yarn
Round 1: In magic circle, ch 2 before making 8 dc into circle. Sl st to top of first st in round. (8 dc)
Round 2: Ch 2. Place 3 dc in first st, 1 dc in each of the next 3 st, 3 dc in next st and 1 dc in last st. Sl st to top of first st in round. (12 dc)
Round 4: Sl st in first two st. Fold your spike in half so that you are now working in a corner. Ch 1 before placing 1 sc through both st lined up in fold and in each to the end. (6 sc)
Make sure you leave a long enough tail to secure your spike to the crocheted hat when finished!
Leave an extra long tail in order to sew this on very securely so they don’t flop around.
Finishing off:
Nose assembly:
Using your tail left on one of the nostrils and your yarn needle, sew nostril in place on front of the Nose/ Snout front piece. Once secure, pull yarn to inside of snout piece and fasten off. Repeat process with second nostril. Next use the tail left for your smile chain and needle to sew the smile in place on Nose/Snout front piece in desired location. You can reference my pictures to see where I placed my own. Once you have it fully sewn in place, pull yarn to inside and fasten off. Now you are going to attach the nose back to nose/snout front piece by lining the nose back up to the opening on the back of the nose / snout. You want to stop about 2/3 of the way around to stuff with your fiberfill stuffing as you sew it around. Once you have it assembled, use leftover tail from assembled nose/snout to sew in place on front of your beanie hat. Once it is secured, pull yarn to the inside of the beanie and fasten off.
Next you want to use the tail left on on of the white cheek areas and yarn needle to sew white cheek areas in place on each side of attached snout lining up white white contrast trim. Once in place, pull yarn to inside of beanie hat and finish off.
Eye assembly:
Taking tail on one of the eye pupils, sew pupil directly on to eye white area in desired location. Once the pupil is attached, pull yarn to back of eye before fastening off. Repeat for second pupil.
Now you take the assembled eyes and place them just above the nose/snout.You can see my pictures to see how I placed mine. I put mine right against the top of the nose/snout. You will use the white yarn tail left on eye whites with your yarn needle to sew them in to place. Once your eyes are secure, pull yarn to inside of the Yoshi hat and fasten off.
The last step is to attach Yoshi’s red spikes to center of back of the head near the bottom (see pictures for placement of mine) to represent the spikes that run down his back. To attach them, take your yarn needle and using a tail left on one of the spikes, sew it into desired place. Once you have it sewn in place, pull yarn to inside of hat before fastening off. Repeat this process for the second spike.
Now take a look over your assembled hat, checking for any loose ends or tails you did not fasten off yet. If you find any go ahead do so now. All done!
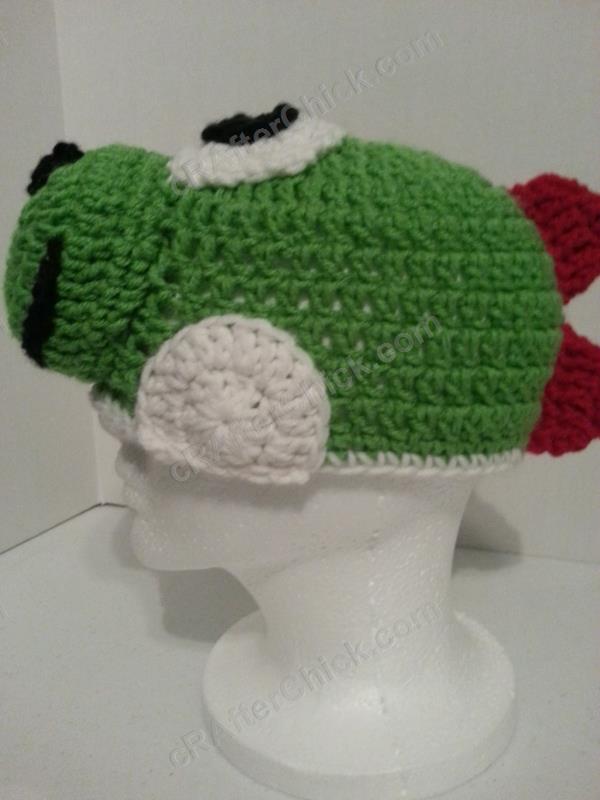
Here are a few of the pictures I took to show how this Yoshi hat looks from different directions when completed:


Want more free patterns? Follow cRAfterChick on Facebook or Pinterest to get updates on patterns as they are added.
Note: All the cRAfterChick patterns shared on this site are free of charge. Please feel free to use them to make your own items. If you use it to make items to sell please credit cRAfterChick for the pattern and provide link to our site. Please do not copy and paste my pattern or try to use my images as your own. You can link to any of my patterns. Happy crafting!
OMG how cute! Many thanks for posting the pattern. I will be making one in blue!
Thank you 🙂 I would love to see yours when it is done!